How to Photograph Machu Picchu
Machu Picchu. You finally made it. It’s the once in a lifetime event you always thought it would be because all the literature tells you it is once in a lifetime. Having been to Machu Picchu twice now, I have a few photography tips that might be of value when you make this journey in your lifetime. Why did I go twice? I was lucky enough to have won a tour at a Meet, Plan, Go! event in my hometown of Seattle. When you see (photo op) you might want to make a note of the next words.
First, take it all in. Sit for a moment after you pass through the turn styles (or if you pass through the Sun Gate on the Inca Trail) and just sit. Your memory actually works better when you don’t have a camera up to your eye. No, I can’t back that up with ‘facts’, but you know it’s true. Sit and let the view sink into you.

Done soaking? Good! Now grab your camera and take the first left hand turn you can find after walking in the main gate. It will lead uphill. Chances are, if you’re with a guided tour, your guide will lead you out and through the (photo op) main gate. You might need to sneak away when they do this. Or just let them know where you’re going.
I realize this is something of a catch 22; if you stay with the guide you get a wealth of info you wouldn’t get by walking around alone. But if you walk around alone you get photos you wouldn’t get with the guide.
The reason I tell you to hang a left is because of a few assumptions: 1) You made it to Aquas Caliente the day before and 2) you headed to Machu Picchu super early in the morning on a bus. Maybe you even hiked up the hill (it takes about 1.5 hours and is sweaty). The point is you arrived at the gate when it opened. Oh! 3) It’s not horribly cloudy. Heck, even if it’s cloudy, take that first left.
Keep heading uphill. It’ll get your heart rate up. After a while you’ll plane out onto a flat, open spot with (photo op) gorgeous views. You can stop here for some shooting, but if you’re near the front of the pack or if it’s crowded, keep heading up and to the left. Eventually you will start on the Inca Trail itself and head back to your left instead of up. This is good. A large-ish wall will be on your right. When there is a break in the wall, head up about four terraces and then turn right across the terraces.
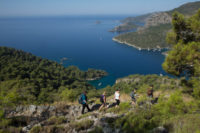
You’re almost (photo op) there! This area is far less crowded especially in the morning. Find yourself a likely (photo op) spot just before the trail to the (photo op) Inca Bridge. Here is a perfect spot for portrait style shots. Wayana Picchu, the pokey mountain behind Machu Picchu, is well framed from this location. The sun is to your right which will make the foreground on the left side of the hill below the city a bit dark. If there are bright, white clouds this day, you’ll want to do some bracketing to make an HDR in your computer later (unless you’re reading this is 2015 and all cameras shoot at least 15 stops of light).

Spend some time here and watch the clouds. Often, because the jungle holds in moisture at night, you can shoot some intense time-lapse footage as that vapor crawls up the green hillsides. If it is a gray day, this spot works well because there is not a lot of sky behind Wayana Picchu and thus, not so much gray in your pictures. Take your (photo op) “I was here” photo at this point. Then start back on that trail you were on, going up to Sun Gate.
But stop before you get there! You know how some things never quite look like how you imagined them? Because you built them up with fantasy in your mind? Kinda like standing at the foot of the (photo op) Empire State Building and wondering why it doesn’t look like the aerial shots taken from a $2 million helicopter with a (photo op) $20 million IMAX movie camera? That’s why a lot of people go to Sun Gate. It’s cool and all, but really it’s just there to make neat patterns at certain times of the year on certain parts of Machu Picchu (you really should have stayed with your guide to learn that part).
Before you get to Sun Gate there is a spot to stop. Not the first one with the (photo op) tall rock to the right. Past that. The (photo op) spot you are looking for is small and has two simple, small terraces on the right side of the trail. THIS is the spot you want. You’ll be seeing a time-lapse movie later this week that contains that photo from this spot. Bring a wide angle lens to capture the whole valley. Bring a 100mm lens to get a nice closeup of the city and the mountain. Bring a 300mm lens to find your friends in the tour group.

Take some time here and watch the pattern of the shadows over the landscape. No need to hurry. Take photos at different times as the clouds (hopefully)(photo op) dance. Then start your way back down with that classic, postcard shot on your memory card and in your brain (please tell me you sat your camera down for a minute?).
It seems as you get closer and closer to the city it just keeps begging for more photos. The crowds are starting to arrive now and you’ll have to jockey for position. Make sure to get the standard “I was here” shot at the (photo op) main gate to the city. There might be a line.
The rest of what I’d suggest for the city itself is to explore. I could give you another dozen shots but really, inside the city, find your own path. Get close. Look at the details. Look at the craftsmanship. Marvel at the odd shapes [the same (photo op)space aliens who built the (photo op)pyramids certainly did not build Machu Picchu…..no square blocks!]. Climb up Wayana Picchu and get a photo from there if you are feeling up to the task and if you can get a ticket.
Heck, maybe even find your guide and listen to some of the stories that help bring this wonder of city to life.
Peter West Carey is a world traveling professional photographer who hosts a variety of photography workshops in Washington and California.
Photo credits: rest, all other photos courtesy of the author and may not be used without permission.